
[vc_row row_type=”row” use_row_as_full_screen_section=”no” type=”full_width” angled_section=”no” text_align=”left” background_image_as_pattern=”without_pattern” padding_top=”30″ css_animation=””][vc_column][vc_column_text]
Some of my students have asked whether it’s possible to make potstickers gluten-free. The short answer is yes. I tested my dough recipe using Cup4Cup Multipurpose Flour and, with a couple of minor adjustments, it worked.
The flavor/texture is reminiscent of stir-fried rice cake. But, the gluten-free dough generally behaves similarly to the regular dough.
A few tips: The Cup4Cup flour requires about ¼ cup more water. I also found that Cup4Cup is too gritty to use for dusting. The workaround is to roll the wrappers on top of a sheet of parchment paper to keep it from sticking to your counter. The dough does tear, if you roll it too thin. If it tears, gently press the dough back together.
Notes: I have not tested the full complement of off-the-shelf gluten-free flours. I tried King Arthur Gluten-Free All-Purpose Flour first and didn’t care for the result. The dough was too finicky – it didn’t hold together and kept tearing – and the flavor of the rice flour was overpowering. Then I tried Cup4Cup. These two products happened to be available at my neighborhood supermarket, so that’s what I tested. Converting recipes to be gluten-free is not my expertise – or focus. I did want to provide at least one option to those who have inquired.
For this recipe, I improvised a filling using ingredients I had on hand. On this day, it happened to be chorizo sausage, fresh shrimp, and kale. If you have Chinese Soul Food, you could try the Pork and Chinese Cabbage filling (page 71), Basil, Chicken, and Shrimp filling (page 77) or the Spinach, Egg, and Shiitake filling (page 73). Simply substitute salt or a gluten-free soy sauce for the regular soy sauce called for in the recipes.
This dough can be sensitive. If it tears, just press the edges of the tear back together.
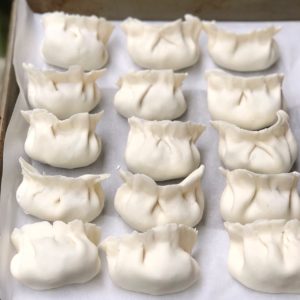
GLUTEN-FREE POT STICKERS WITH CHORIZO, SHRIMP, AND KALE
MAKES ABOUT 45-50 DUMPLINGS
For the dough:
2 ½ cups Cup4Cup Multipurpose Flour
1 cup plus 1 tablespoon warm tap water
For the filling:
½ pound bulk chorizo sausage, or links with the casing removed
½ pound fresh shrimp, peeled, deveined, and finely chopped
2 cups of kale leaves, with woody stems removed and leaves finely chopped
2 stalks green onions, trimmed and finely chopped
½ teaspoon salt
Vegetable oil, such as canola, for cooking
To make the dough: Combine the flour and water in a medium bowl. Stir with a spoon or rubber spatula until the flour starts to clump. Then, using your hands, work the dough until it comes together into a ball. Knead the dough for 2-3 minutes, or until smooth. Return the dough to the bowl and cover the bowl with plastic wrap. Set aside.
To make the filling: Combine the sausage, shrimp, kale, green onions, and salt in a medium bowl. Mix well.
To make the dumpling wrappers: If you have parchment paper, place a sheet large enough to cover your work space. Something in the 12-by-12-inch range should do. (Since parchment comes in a variety of dimensions, use your judgment.) If needed, tape the edges of the parchment to your work surface to keep it from sliding around.
Divide the dough in half. Cover one half with the plastic wrap to prevent it from drying out. With the other half, roll into a rope that is about ¾-inch in diameter and roughly 18 inches in length. Using a knife or bench scraper and a cutting board, cut the rope into pieces that are about ¾-inch thick. It’s equivalent to a heaping teaspoon of dough. This dough may be a little sticky. Roll each piece of dough into a small ball and then flatten it between your palms to create a disc that resembles a wafer cookie. Place on the parchment paper in front of you. Position your rolling pin between you and the base of the wafer of dough. Roll the pin forward across the dough and back. You do not need to life the rolling pin. Turn the dough 90 degrees and repeat the forward-and-back rolling. Turn the dough 90 degrees again and repeat the rolling. This forms the beginning of a circle.
Repeat this for the second revolution, but, for subsequent turns, roll the pin only halfway up. For the third revolution, roll the pin only a third way up. The idea is to leave the center of the circle just slightly thicker than the outer edges. The wrapper should end up being a circle about 3 ¼ inches in diameter. Don’t worry if the circle isn’t perfect; it only needs to be roundish. If the wrapper tears, just press the edges of the hole back together. Roll out a few at a time and fill. If you roll out too many, the dough will dry and it will make it hard to seal.
To fill and fold: Place a mounded teaspoon of filling in the center of the wrapper. The simplest way to seal a dumpling is to fold it in half into a half-moon shape. Match the edges together and press as if you were sealing an envelope. There is no need to dab homemade wrappers with water. Holding the sealed edge of the dumpling between your fingers, set it on its spine and gently wiggle it as you are pushing down so that the dumpling will stand up. Place the completed dumpling on a baking sheet lined with parchment. Repeat with the remaining dough. (To pleat the edges, watch the video below.)
To cook: Preheat an 8- or 9-inch nonstick skillet over medium heat for about 1 minute. (If you have a bigger or smaller skillet, that’s fine. Adjust the amount of oil as needed.) Add enough oil to coat the entire surface of the pan and create a slight pool of oil about ⅛-inch deep. This may seem like a lot of oil, but it will help you create that telltale crispy pot sticker crust. Carefully place the dumplings in a single layer in the skillet, flat side down. Add ½ cup of water to the skillet and cover immediately with a lid. Cook for 7 to 9 minutes, or until the water has evaporated and the bottoms of the dumplings have reached a golden brown. The cooking time may vary slightly depending on your stove. When finished cooking, turn off the heat and, using tongs, remove the pot stickers to a serving plate.
Dipping sauce: I usually serve pot stickers with a soy-ginger dipping sauce. If you have a gluten-free soy sauce or a tamari, you can make this sauce. Mix together in a small bowl: ½ cup gluten-free soy sauce; 2 tablespoons unseasoned rice vinegar; 1 stalk green onions, finely chopped; 2 large cloves garlic, finely chopped or crushed; 1 tablespoon chopped fresh cilantro; and 1 teaspoon minced fresh ginger.
How-To Video: The following video shows the regular dough made with all-purpose flour. But the rolling and folding technique are the same.
Potstickers from Hsiao-Ching Chou on Vimeo.[/vc_column_text][vc_separator type=”transparent” up=”25″ down=”0″][vc_separator type=”normal” color=”#ffffff”][/vc_column][/vc_row][vc_row row_type=”row” use_row_as_full_screen_section=”no” type=”full_width” angled_section=”no” text_align=”left” background_image_as_pattern=”without_pattern” css_animation=””][vc_column][vc_separator type=”normal” color=”#ffffff”][/vc_column][/vc_row]
Leave A Comment